Monday, October 10, 2011

Mouthpiece Methods

For a couple days I've been trying different approaches to making the mouthpiece for the black Every Whistle. It's not a case of how to make one, but rather how to make them in production mode. The more uniform the better, and the quicker the better. 

I had made one whistle by simply splitting a section of pipe and slipping it over the head. This worked, but the pipe didn't really want to stay round when spread that much. It would go a little oval, and impact the windway height. 

I was thinking of trying some heat to relax the plastic after splitting it to see if it came into a round section easily. Jem mentioned that the plastic can be expanded enough to fit over it's original OD with heat on a mandrel. So I bought a heat gun and had a go at several approaches. 

Two mandrels

The first mandrel was made from aluminum bar and looked really nice all polished up to eliminate extra friction. The problem was, aluminum conducts heat really well, and the mouthpiece would cool as it was pushed over the mandrel, requiring heating one or two more times. The good news is the aluminum doesn't have a high specific heat, so it warmed up quickly and things worked pretty well once the mandrel was warm. I considered, and am still keeping on the back burner, fitting the mandrel to a heat source such as a soldering iron. It could be threaded on in place of the soldering tips. But that might be more work than it's worth.

I thought a Delrin mandrel might work better, leaving more heat in the mouthpiece. So I made one out of Delrin, and it did work a better. Good enough that it shouldn't be too hateful to make a couple dozen at a time. But it also worked nicely to split the mouthpiece and heat it on a mandrel to shape it for the whistle. 

While I was trying different techniques to make the mouthpiece, I was trying different ways of finishing the whistles. 


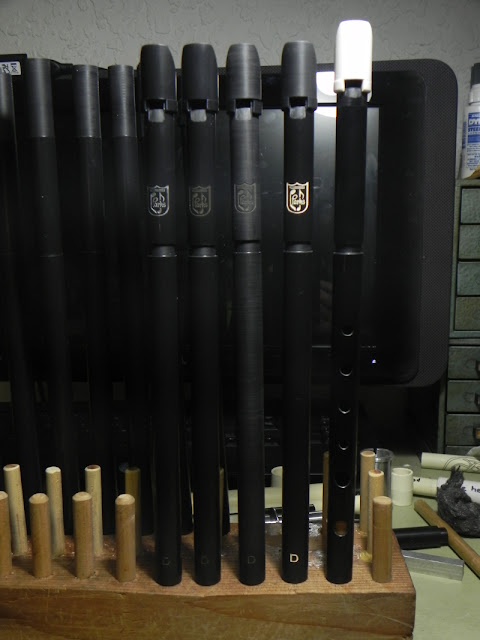
 Here are three whistles with different treatment of the logo. The left one is painted with cream paint that matches the color of the CPVC I have locally. The middle one is simulating a gray paint. It is really polishing compound left in the engraved logo. The right one is as it comes from the engraver with no treatment by me at all.


 Here is a more distant view of the whistles. The one in the middle was treated with sandpaper and steel wool while on the lathe to make a brushed finish going around the whistle. It reminds me of uni-directional carbon fiber or fiber glass. Not bad looking. Lighter than the native black color. The one on the right is a white color, and no logo in on that whistle because it is the original prototype.


 Here's a long view of the various color and mouthpiece options. 


 Here you can see the second from the left has the split mouthpiece treatment. 

They all play alike, so it's down to how it looks and how easy is it to make over and over again.

I think I'll take some time out from the mouthpiece R&D to lay out the finger holes and make playable whistles out of the ones made so far. 


Wednesday, October 5, 2011

More R than D

I'm somewhat stymied at the moment. Not that I can't make a whistle, but that I can't find material the color and size of material I would like to use. 


All I really have that I can put to use directly, using the approach in the white Every Whistle, is white. The cream fitting (far right) that I hoped to use is of course the size of the pipe OD, and to achieve the wind way height that I want I need to reduce the OD of the pipe a few thousandths of an inch. Which makes the fitting too big to fit properly.

I also thought that I could use a section of the black pipe split in the back and fit over the head to make the mouthpiece. Not so easy. This pipe is not as stiff as the CPVC, but it is more so than the clear pipe I use for the Ghost whistle. The result being the mouthpiece doesn't stay round, but goes oval, with the sharper ends on the sides and the flatter spot opposite the split in the back. This makes the wind way too thin and might make the attachment of the mouthpiece tenuous. It stays on OK for the moment, but if the whistle is dropped I worry that it might come adrift because it doesn't have enough contact area to cement it in place.

So, the only color combination I can confidently produce at the moment is the pure(ish) white on black. Which was my least favorite option. But I might have to start liking it.

I'm going to try working the section of black pipe so it conforms to the shape of the whistle head a little better. That might be the best option. The logo on the dubh-dubh whistle above is as it comes from the engraver. I might like to fill it with something, even if it's a different kind of dubh. For example, if the whistle is finished in gloss black, paint with flay black, or the other way round.

Regardless, for a name I'm now considering "Every Dubh" (Pronounced sorta like: Duv) so the Every family will have the "Every" and the "Every Dubh" available in the same keys and sets. Yes, I plan to do an "Every Dubh Walkabout" in C and D. What order these will all come about in I can't say. I am thinking about making some of the keys or color combinations made to order.

Monday, October 3, 2011

Yesterday on the way home from the session I picked up the dubh whistles I dropped at the engravers the week before. 

Here's the batch on the workbench - a dozen D whistles, and a dozen each of C and Eb bodies with which to make sets as needed. My approach is to do as little work as possible before engraving so if anything goes awry during engraving I have lost a minimum of work. 


Below is a close-up of the logo. I asked for the engraving to be done rather deep so I could fill it with a lot of paint and it wouldn't rub off. 


Before they are whistles, I need to turn the ID and OD of the top of the whistles to accept the fipple and mouthpiece, cut the wind ways, file the labium ramps, assemble the heads, drill the finger holes and voice the whistles. So don't get impatient, most of the work is yet to be done. 

Monday, September 26, 2011

Which Is Heavier?

I made a comment in response to a post on Chiff & Fipple which suggested the black whistles would be lighter than the white whistles. Jem, who has handled both thought the opposite. So I thought I'd find out. I trimmed a length of both pipes to the length of a C body and went looking for my gram balance to weigh them on. 


Oh darn, that's right, I sold that a year ago. Hmm.... how to fairly compare them? They seem so close, a subjective bounce-in-the-hand approach isn't going to work.  Maybe I could float them and see which floats higher? The OD is so very similar. But the black pipe is just enough smaller that a pair of calipers clamped on the pair holds the black pipe and lets the white slide thru. Just. 


Obviously I need a constant OD thing to float to compare the two. Well, lookie there, a section of PVC pipe. Imagine me having a section of PVC pipe lying around. I taped the bottom closed and floated each test piece in water. 


Darn near the same. The black line, submerged in the photo above, is where the water level of the black pipe fell, and the blue line is the white pipe. For practical purposes they are the same weight. I am going to use the same machining dimensions for the two pipes, so aside from the very minor differences in the weight of the material I will remove, the weight of the two whistles will end up the same for practical purposes. 


So now we know. 


Which brings up a related story. I once owned a kayak that was yellow deck over a yellow hull. When I weighted it, it was four pounds heavier than the factory spec. So I called them and asked if that could possibly mean the boat was holding water in the fiberglass or something. "Hmmm... is the boat yellow by any chance?"  "Well, yes, it is." "That explains it. Yellow boats are heavier than other colors."  "What?" "The yellow gel coat is more translucent than the other colors, and we have to put on a thicker layer to keep the fiberglass from showing through."  


So now you know.  

First Dozen To The Engraver

Just a quick note to report the contents were intact and there is enough pipe to make 104 D whistles plus a lesser number of C and Eb bodies. I made up a dozen D whistle blanks, C and Eb bodies and dropped them off at the engraver yesterday. I should have them back next Sunday.

I didn't want to commit any more pipe at this stage, since I may find I want to adjust the length of this part or that before making more.

I took some photos but they are stuck in the camera. I can't find the cable with which to let them out.

But I do have a sound sample of the prototype which uses all the notes below 2nd octave C: Carey playing three jigs.

Take care,

Carey

Saturday, September 24, 2011

Arrival

The package from Phil arrived yesterday, which was quite good time to cross the Atlantic. Here's the courier punching up the document for me to sign to accept the shipment. Out man here used to be a musician in the Cleveland area where I lived until going of to university. Small world. Perhaps he will come catch a session sometime. 


The pipe sections can roll over one another in the box, so the ends have no internal support. The result being a landing on the edge opened up the box a bit. I don't think anything went missing, but I have not opened it up yet, knowing after I do so it will consume all of my time. And the grass is getting really tall and I have an errand to run today. But after my grass cutting and errand I will open the box and dive in to the project.

Is mise,

Carey

Friday, September 23, 2011

Prototype Progress

 Yesterday I decided to get a jump on the Parks Black/Ninja/Shadow/Stealth whistle project before the box of material from Phil arrived. I had one section of pipe of sufficient length to make another body for Prototype #1. So, since I had not yet tried to place the tone holes in locations appropriate for this pipe, I decided to get as many tries out of the existing body as I could. 

 Above is the prototype as it was. 


I cut a piece of all-thread (I'm not even going to ask what it's called in England) and made some square Delrin nuts to use as stops for the hole template. I put the nuts on the rod in positions matching the holes in the prototype, then played the prototype into Flutini, chewed on the exported data with Polygraph, and got the RTTA plot I expected, inclined from one end to another since the ID of this pipe is different from that which the template was created for. 


So I cranked the nuts around on the rod into positions that I thought would be better and drilled a set of holes opposite the exiting holes. Did I mention I engraved "Set 1" on the side with the original holes? Gotta keep track of who's who here. It's easy to get confused when they all look the same. 


After de-burring/undercutting the new tone holes I taped over the old set of holes and played the whistle for the computer. Better, but still a way to go. 


Above is the hole template and Prototype 1, Body 1 with three sets of holes. 

Repeat with "Set 3" see above with two lengths of tape covering sets 1 and 2.  Not too shabby sounding, and the plot confirms it. 


So I make a final adjustment to the hole template and went for the new section of pipe. I could have done another set in the old pipe, but frankly I was running out of time if I wanted to take this whistle to the session that I was about to attend. That, and the "spare" holes, even tho taped over, are perturbations in the air flow so if you get close, one needs to go with a fresh section of pipe. 


The last hole arraingement going into the drilling jig.

Locking the template in the jig. The sliding car which holds the whistle body for drilling is see on the right here. It slides in the grooves of the aluminium extrusion under my bench-top drill press (pillar drill.)

Here's the last hole, with the clamping mechanism of the sliding car on the left, and the brass pin (like the knurls?) that locates against those Delrin nuts. 


Not perfect, but not too bad either. Good enough for folk music as the saying goes. 

People who played the prototype like the sound, but said they needed some time with the whistle to see how they really liked it. 

I also would like to make the mouthpiece and markings the same cream color I'm using on the Bb whistle. That may be a challenge given the dims the CPVC is available in. But I'll have a go and see if I can manage it. 


Thursday, September 22, 2011

Little Pieces From Big Pieces

Phil sent these photos yesterday, which is when he got the package off. As you can see in the photos, Phil is a man all about music. Tools? Yeah, he can probably handle those as well, but he's having a little fun with us. Catch Phil on BBC Lancashire on Fridays.  

(click any photo to enlarge)

I notice his tape measure (do the call it that in England?) is in centimeters only. Mine is in inches only. However most of the smaller rulers and things have both imperial and metric units. Is that the case in England too, or is it only here where we're too darn lobbied to make sensible decisions? 


Careful Phil, the mechanical dinosaur looks like it's winning! 


Not a bad sized parcel. If I understand Phil's e-mails, he's done two rounds of cutting 30 meters each time following the schedule I gave him. So there is 60 meters of pipe in that box. 


Cutting Schedule
Pipe   Cut
 1     8x375
 2     8x375
 3     8x375
 4     8x375
 5     8x375
 6     8x375
 7     10x300
 8     10x300
 9     10x250,  1x375
10     3x375,   5x300, 1x250


I planned it out so we could get the most whistles out the ten three meter pipes, going for a balanced mix of D whistles and C and Eb bodies. We are not going for any Walkabout models in this iteration. the are similar, but require an additional cm or two to cut the joint between hands. 


A man after my own heart. Riding his bike to send off the pipe sections. I also deliver most of my shipments to the local post office via my bicycle as well. Maybe I'll get a photo of that sometime too. 

Wednesday, September 14, 2011

Black High Whistle Development

I have been wanting to make some high whistles in black, but try as I may, I could not find a source of suitable pipe in America. I found one possible source a couple years ago, but they just sold the last of their black stock and were not ordering more. A few months ago I found a source for 1/2" PVC in black, but the smallest they had was schedule 40, so I made some alto whistles in black. (Which you can see on my web site at http://parkswhistles.com/AltoWhistles.html
Recently I found a web site that will make "any size, any color" PVC shapes. OK, this should be it. And it would be, if I wanted to purchase 20,000 feet of the stuff. Yes, you did the math right - almost four miles. I'd have to put it in my will.

Quite a while ago, I did a swap with a "web pen-pal" Jem, a wooden flute player, restorer and pvc piccolo maker in Wales, UK.Jem sent me a few lengths of the pipe to experiment with. It would make a nice whistle. But I couldn't find anything like it over here, and I didn't feel right asking Jem to get involved, as I didn't want to put the burden of a regular commitment on him.

One of my dealers, Phil Brown at Big Whistle Music in the UK, called a couple weeks ago and while we chatted he mentioned that he thought he could sell more of my whistles in black than white in Europe.

"Maybe the white color doesn't cross the Atlantic well" he suggested.

"No, I think people would like a black whistle here too" I replied, "But I can't find the stuff over here."
I told Phil about the pipe from Jem, which is sold as electrical conduit in the UK. I had the brand, size and everything, and they sold it all through Europe and Asia from the looks of the web site, but nothing in North America.  
 
So began Phil's quest for the pipe, and after only a single day I see the following in an e-mail from Phil: "I found where I can get it, but they have to order it in special. If I waited a day to place the order, it would come in a week later. So I placed the order before speaking with you. They only sell it in ninety meter lots. I hope that's OK, because it's too late if not."

HA! My man Phill seems as excited about this project as I am.

Suspecting it might make an interesting tale to follow in real time, I plan to report on the progress as the material arrives, comes across the Atlantic and is turned into the first batch of black Parks high whistles. So as milestones are reached I'll post some photos and reports to this blog.

From what I can tell having played around with a short section of the material I got from Jem, the whistle will sound enough different from the white Every that I don't want to use the same name. Plus the material will be more costly with the shipping over etc. so it will be a different price. So it will need a new name. The first name to come to mind is "Ninja", because of the blackness. Not sure that's Celtic enough.

Thoughts?

Here's Phill taking delivery of the first ninety meters. 
(Click on image to enlarge)

Another shot of what ninety meters of 17 mm conduit looks like. 
That should keep me busy for a while. 

Saturday, September 10, 2011

Letter To A Beginner

From time to time I get questions about my whistles, and I'm happy to tell people about them. Considering that for every person who asks there are several others who wonder, I thought I'd just put my reply to Mike on my blog where everyone can read it. 


Thanks for asking Mike!


Hello Mike,

Yes, while an advanced player will find a lot to like in the Every Whistle, it is also quite suitable for a beginner. In fact, I was a beginner myself when I designed it, and thus I wanted it to be easy to play. Air requirements are low for the volume. The only way to use less air is to make a smaller wind way, which would make the whistle quiet to the point where it would not be useful in a session. 

That said, by closing the "Parks Tone Ring" down, not only do you make the whistle quieter, but you also reduce the air requirements. 

My whistles are appropriately loud and shrill at the top of the second octave when the Parks Tone Ring is fully open. Not as loud and shrill as some however. In time, when you learn to finesse the whistle you will come to control and appreciate this character as appropriate to the music and the instrument. But by closing down the "Parks Tone Ring", the upper octave is the first to be tamed, giving you a nice somewhat airy sound without reducing the volume very much. 

At the other extreme, if you close the Parks Tone Ring until it is open only a crack you can play at a whisper. I've had one customer who wrote to thank me for the tone ring because it allowed him to practice on a cross-country flight without disturbing the passengers nearby. But my favorite was a fellow who wrote to tell me he could play in bed while his wife was asleep! 

So yes, by all means, try one of my Every Whistles. If you find it not to your liking you may return it.

Here is one of my customers, Tiffany, playing "An Feochán" (Gentle Breeze) on an Every D whistle. [Click to play]

You can't rush the training of your muscles. You just have to play, play and play some more, and the skill and ability will accumulate within you. Only play when you enjoy it, and put the whistle down when it is no longer fun. You need to do this to allow your body to assimilate what it has learned during the session. I find several shorter sessions per day are better than one long one. 

In the early stages you are teaching your body how to make the sound you want, so the notes of a tune or song are not as important as just making the sounds. Play things you know by heart. Don't struggle with dots on a page and try to learn to map them to finger positions. This will only be a liability in the future, involving way more of your brain than is helpful. Learn the tune so you can hum or whistle it with your lips before you try to play it, then play without looking at the dots, unless you just can't figure out what that one note is - then identify the note and put the paper away again. 

A friend at our session recently related a story. He was at a music seminar and one of the students asked another "So can you read music?" The second replied "Oh yes, I went to Juilliard. How about you?" "I can read music some, but not so much that it gets in the way of my playing."  

Good luck, and enjoy the journey.

Carey

Sunday, August 14, 2011

Alto Bb Whistle In Production, A and G soon to follow


So I've made the Bb, and I have an A and G length body on the workbench waiting for me to get around to figuring out where the best place to put the holes is. 

I've been side-tracked by interesting technical questions pertaining to how to check the intonation of the whistle in my mid-90F shop when it is to be played in a upper 70's environment, and how best to adjust the holes by micro amounts. It's not as simple as moving the tuning slide, because the whistle is exactly in tune with itself AND other instruments only at one ambient temperature. Move the slide in or out and you move the high finger holes more (proportionally) than the lower ones, and mess up the intonation. Not so much that you notice on a casual playing, but enough that I can measure it, and I want the whistles to be as good as possible in actual use. 

Another challenge is the variation of the ID of the tubing as it comes from the factory. Is it less work/cost to try and "fix" the ID so I can use the same hole jig or is it better to leave the ID alone, and ooch the holes around to suit the ID on every whistle? 

I think the answer is ooching the holes for the ID of the whistle, but that requires a good way to measure the effective ID and calculate and accurately set the hole locations. 

Maybe it would be easier to use metal tubing with a constant ID. But I sooo like the black and cream colors of the Bb whistle....

Wednesday, March 2, 2011

Happy St Patrick's Month

Here it is St Patrick's Month. I wish I were five people given the number of calls the band is getting for gigs. Too bad we can't take them all, or rather too bad they all want to be on the same day. I'll post some photos of the gigs after I have some. Looks to be fun though. www.theboysofcountylee.com


The surgery went well. That was my first un-natural opening in my epidermis, and it was kinda fun being the center of all that attention at the hospital. Then three hours after the doc closed me up they told my wife to go get the car and take him home. Which was good too, being home that is. But getting home, my poor wife couldn't drive carefully enough to suit me. Every wiggle of the car put a strain on my new incision. Owch! 


Sitting around was pretty boring, but I read a lot and did get the new web site done. Do you like it? 


I'm in the final stages of developing some alto whistles. They will be G, A and Bb. Stay tuned for more on the alto whistles. 


That's it for now, I have to get back to finishing up some orders for dealers in England and Canada. 


Slan,


Carey